Seervision Pauli Quickstart
This article covers the basics of getting set up with a Seervision Pauli robotic head
This quickstart is aimed to get you started specifically with the Pauli robotic head, which is sold by Seervision. Due to its nature, the quickstart is kept brief on purpose. If you would like to have more technical detail, you can always access the Pauli PDF manual here. You can also find the tech specs of the Pauli head at the bottom of this page.
You will need to have our web interface open and ready to go – if you’re not certain how to get to it, read our manual’s Getting Started chapter first.
You’ll notice that there is quite some overlap between this Quickstart and the more generic Robotic Head Quickstart – this is intentional. This way, we make sure that both pages can stand on their own without the user needing to navigate back and forth.
Mounting the Pauli
The Pauli robotic head uses standard 3/8″ screws at the bottom of its base that are used for securely mounting it. The mounting options are standard, using a mounting plate or a ball mount. The Pauli can also be mounted upside-down, though this will need to be configured in the software after mounting.
Mounting a camera onto the Pauli
Before mounting the camera, make sure the Pauli is in its neutral position: the Seervision logo on the base of the Pauli, as well as the lens control connectors (PDMovie, Fujinon, Canon) should be pointing towards the same direction.
A mounting plate should have been provided together with the Pauli package. Mount this plate on the bottom of the camera you wish to mount, then slide the assembly into the plate-holder on the Pauli head.
Lastly, connect the SDI Out of the camera to one of the two SDI loop-throughs on the Pauli head. Both SDI1 and SDI2 are equivalent and are directly connected to the respective SDI1 and SDI2 connectors on the base of the Pauli. For powering the camera, connect its power supply to either the D-Tap or XLR power port on the Pauli head.
Lens control
Lens control (i.e. setting the zoom/focus/iris) on the Pauli can be done in two ways: either by using external lens motors (works with nearly all lenses, but is a bit more complicated) or using a digital lens protocol (only works for supported protocols, see below).
External Lens Motors (PDMovie Air motors)
Controlling the lens via external lens motors is very versatile and works with nearly all lenses, but the setup is a bit more complicated. We made a video about the process of “rigging” the PDMovies on a Pauli below.
Once you are done rigging the external lens motors as shown in the video, use the LEMO cables provided to connect them in series, and connect one of the motors to the PDMovie port on the Pauli head. With the Pauli powered on, initiate the lens motor calibration by holding the button at the bottom of the motor for 1-2 seconds. The calibration process can be interrupted anytime by a single press of the button.
Once the LEDs on the motors light up, verify that:
- The motor for the Zoom control has a red color that is not blinking
- The motor for the Focus control has a green color that is not blinking
- The motor for Iris control has a blue color that is not blinking
If one of the colors is not correct, press the button at the bottom of the motor twice in a row until the correct color shows. To stop the LEDs from blinking, press the bottom button five times until the lighting is constant.
Depending on the configuration, it may be that the lens motor is turning in the wrong direction. In other words, when you use the Seervision Suite to zoom in, the lens actually zooms out (idem for focus). In that case, just inverse the lens motor direction by pressing the bottom button seven times.
If you are running a Pauli V2 (all Paulis shipped after Q1 2021), verify in its web interface that the lens control is set to PDMOVIE. If you are running an older Pauli, these are configured by default to use the PD Movie protocol. In case you aren’t certain, just shoot us an email and we can check it out.
Digital Lens Protocol (Canon/Fujinon)
The Pauli robotic head also supports steering over digital lens protocols. It can be set up as follows:
- Make sure that the lens supports the digital protocol you want to use. This can be verified by looking up the lens specs, or contacting your Fujinon/Canon representative. If it does not support the protocol, this lens control won’t work, so make sure to double-check!
- Use a 10- or 20-pin connector to connect the EXT port of the servo to the Fujinon/Canon port of the Pauli head. These connectors are often provided by us on-demand, or by other suppliers
- Connect the servo power cable to the power port on the camera
- Make sure that all controls on the servo are set to S (for servo) and not M (for manual)
- If you are using a Pauli V2 (all Paulis shipped in Q1 2021 and later), set its lens control to Fujinon/Canon mode in the head’s web interface. You can access this web interface through your browser on the head’s IP and port 3000.
Wrap-up
At this stage, you should have a powered-up Pauli, with a camera, lens and lens actuation configured. The next steps are
- Connect the Pauli to LAN so that it can communicate with the Seervision server
- Route the SDI1 or SDI2 (depending on your choice) to the Seervision server (for more details on how we use SDI, see SDI and Seervision)
- Double-check that you have configured the correct lens protocol on the Pauli in its web interface on port 3000 (only for new Paulis).
- Configure the Seervision server to control this Pauli head (see Seervision Server Setup)
Pauli V2 (2021 and later) Technical Specifications
| Camera payload | 20 kg |
| Weight | 8.4 kg |
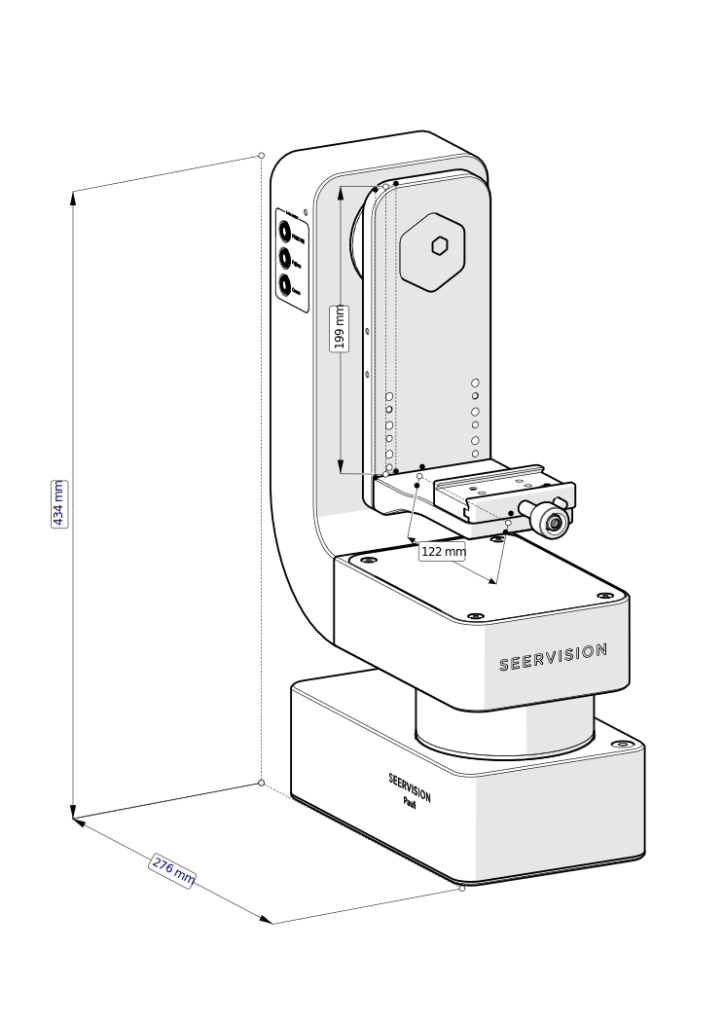
| Dimensions | 434 x 276 x 144 mm |
| Pan angle | ± 175° |
| Tilt angle | ± 180° |
| Pan speed | 0.001-180°/s |
| Tilt speed | 0.001-180°/s |
| Acceleration | 90 °/s² |
| Presets | Preset play/run, preset array, maximum 100 points, preset in some axes and manual control in others possible |
| Temperature operating range | -10° to 45° |
| Power requirements | 100-240 VAC |
| Connectors (audio, video) | 2 SDI coax pass-through |
| Joystick | Any joystick with VISCA over IP; Skaarhoj configurable Joystick |
| Connection | IP Ethernet |
| Noise level | 40 dB |
| Communication connectors | Ethernet with Ethernet switch in the head – 2 connectors in the base and 1 for the camera, all with locking mechanism |
| Power output connectors | 12VDC, 60W D-tap and XLR |
| Zoom, Focus, Iris control | Interface for Canon and Fujinon lenses, interface for PD Movie external lens motors; LANC & Panasonic analog |
| Mounting | Standard tripod mount, reverse mount possible, 90° wall-mount with adapter possible |
| Protection class | IP52 |
| Shot Recall Repeatability | ±0.025° |
Pauli V1 (pre-2021) Technical Specifications
| Parameter | Value |
| Maximum payload |
Up to 7kg for full performance; up to 15kg with reduced performance |
|
Pan axis range |
±175 degrees (nominally limited in software to ± 90 degrees) |
|
Tilt axis range |
± 180 degrees (nominally limited in software to ± 20 degrees) |
|
Pan/tilt axis velocity range |
± 0 to 180 degrees/s |
|
Power supply (AC) |
100-240 Volts |
|
12V out connector (D-tap and XLR) |
12V DC power |
|
Weight |
6.5kg |
|
Operating temperature range |
-10 to +35 degrees Celsius |
|
Storage temperature range |
-20 to +60 degrees Celsius |
|
Ambient humidity |
10% to 90% non-condensing |
|
Protection class |
IP52 |